Showing posts with label tutorials. Show all posts

Tuesday, 3 January 2017

Ballerina's birthday


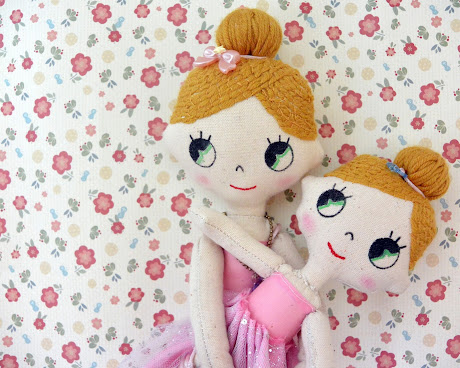
When Gemma turned 3 years old, about one month ago, I gave her as a gift a ballerina doll that I made myself. She really loved it, also because she is really devotee to the dance! Since, she liked it very much, I decided to make a tutorial, which you can find on my etsy. I hope you like it and that you will enjoy to make this doll!!


Sunday, 27 March 2016

Happy DIY Easter


Happy Easter to everybody! And many thanks to Petit-Bateau and to Steffie Brocoli for this cute DIY project with which to realise funny boxes with the shape of a bunny. Steffie is an illustrator who lives and works in Paris and who creates really cute stuffs (take a look on her etsy shop!). If you'd like to realise you too these amazing boxes, you can download the pattern here. On www.petit-bateau.fr, you can also find many other DIY projects signed by this illustrator that will made your Easter!! I am sure!!


Friday, 26 February 2016

A mermaid in Paris...


That's Gemma! Once we knew that the annual theme of the Paris Carnival was "the sea world", my daughter wanted to participate with her costume of little mermaid. Actually, she loves the tale and the cartoon of the little mermaid and, even when she takes her bath, she loves to play with figurines with the shape of the little mermaid (such as the duplo and koeda-chan here below, which are her favourite ones)!!!


Inspired from Gemma's love for the mermaid, I have done a complete series of creations inspired to her. A fabric doll, a tutorial to make it and a hand carved rubber stamp are now available on my etsy shop. For the tutorial, there's two alternatives: either to buy the pdf alone, or to buy the pdf and a the fabric patter already drawn by me (for whom that find difficult to draws her face).


I hope you like it

Wednesday, 9 December 2015

Two years together!


On the 25th November, Gemma has turned 2 years old! She's already a cute young lady, she's really growing up quickly, my little darling princess! These 24 months together have been amazing, hopefully I monthly reported the evolution of our little family... I do not know until when Gemma and Fifi will accept to participate into this photo project (see below), but it is really funny to see through it how Gemma has changed (and we get older...)


For her birthday, she aimed to be dressed as a fairy princess. Once she saw it in a shop, she wanted this glittered "dreamy" dress. I have also made a magic wand and a crown to complete her birthday clothing, but she did not wanted wear the crown. Instead, she tried to make Fifi wearing it and she brought the bunch of wands that I have made at the park, in order to share them with her friends for a little magic birthday party!


Taking Gemma's sample, I would like to share the magic wands and the crown with you. Here you can find the templates to make the wand, while here's the crown, which you can download and use (only for personal uses).
Instructions
The magic wand. You need some cardboard, some fabric, some paper straws and some permanent pens for fabric to draw the face on the star. 1. Cut some cardboard and some fabric following the template. 2. Sew the cardboard to a paper straw. 3. Draw the eyes, the nose and the mouth onto the star and then iron it (to make it permanent). 4. Glue the fabric on the cardboard. Voilà!!
The princess crown. You need some glittered paper, some felt and an elastic thread. 1. Cut the glittered paper and the felt following the template. 2. Glue the paper on the felt. 3. Sew some elastic thread, fitting to you measure. Voilà!!

A last thing. I want to dedicate to Gemma this cute song, not only because its video was partially turned in my lovely birth town (in Carrara, at the quarries), but also and especially because it is a kind of ballade in which a mother tells to her daughter that she is going to grow following her natural and personal attitudes. I believe that all parents should try to encourage children to do this, without imposing any "plan" and without considering them as "empty box" to be filled. Happy birthday my little darling Gemma!!!

Sunday, 5 April 2015

Easter everyday! DIY amigurumi maracas project tutorial


For Easter, I would like to show you a cute project that is dedicated to a person who can be considered the "King" of Chocolate and who has recently passed away: Michele Ferrero. He not only invented the Nutella, but he also created his little "Kinder Surprise" chocolate egg that, as he claimed, he made possible the Eater everyday. Actually, this little chocolate egg, like the Easter egg, contains inside a little "surprise": either a little toy or a special collectible figurine.


Whole generations of children throughout the world loved and love Kinder surprise. Gemma as well has been captured by the charm of the magic little egg... thus the collections of little figurines that I gathered during my childhood can be continued! And, in order not to put anything into the rubbish, I have found out a way to re-use in a kawaii way the yellow plastic capsule that contains the surprise into the eggs!


In order to turn this plastic capsule into a kind of maracas, it is sufficient to full the capsule with anything that makes a sound shaking it: some dry beans or little stones, rice, sand... The sound changes accordingly to what you put inside and to the quantity of stuff that fills it. Using different maracas with different sounds, the child could improve her or his sense for the music.


Once you have filled the capsule, you can crochet a "cloth custom-tailored" for it. Here you can find here some photos, which I have found in a book, about how to make an "amigurumi" in a simple and step by step way. But I am sure that the easiest thing is just to ask around you to mums, gradmas and aunts... to crochet or knit was so widespread and I am sure that in each family there is someone who is able to do this! Moreover, it could also be a cute way to spend the Easter or another together with our beloved.


Me too, I discovered that my mother was gifted of real talent in doing these little crochets and she immediately produced these three little cuties! Actually, I have added the eyes and the rest of their pretty little faces, which I have made with some felt. The only thing to keep in mind is to use a crochet hook littler than the size indicated on the thread, just in order to make a thicker weave.I hope you will enjoy doing these ones!! It is obvious that Gemma adores them all!!!


Monday, 11 August 2014

Travelling with fantasy... on a paper boat


Summer is often synonymous with travel. A journey that could be to exotic and relaxing destinations, where it is possible to rest from the tiring and stressing winter... It is possible to travel by many means: by car, by train, by pane, by boat... but above all, it is possible to travel by fantasy. It is sufficient to come on board of a little paper boat and to be cuddle by the unforeseeable waves of a limitless imagination.


This new stamp is especially made for all the dreamers who love to travel with their imagination. It enables to create poetic paper boats on diaries and other paper stuffs, but also on fabric - like I have done to decorate this handmande bloomer (here if you need a cheap tutorial) for my dear little Gemma. If you'd like to do an origami paper boat, you can download this tutorial here.


I hope you like this new stamp, who can fin it on my etsy. After all, we are in the same boat, sharing the same dreams, fears, wishes, hopes, while we are floating toward an uncertain destination.


Saturday, 14 June 2014

Baby summer bloomer tutorial


It is finally came the summer, the first summer of my little Gemma, who - with my great surprise, revealed to be a cute beach babe! In order to make even more stylish my little model, I have decided to conceive these cute baby bloomers, which I have also decorated with some special summer rubbers stamps.


It seems that Gemma really enjoys these funny clothes. If you would like to try to make you too some cute bloomers, I have prepared an easy to follow tutorial, with step-by-step descriptions and the patterns to be printed out and used to produce the bloomers. This tutorial is available for sale on my etsy. And if, once sewed it, you'd like to embellish the bloomer with a cute pattern, why do not try out to use a hand carved rubber stamp, such as these ones with a marine style!


Monday, 7 April 2014

Sweet birthday party


These days of spring, in which the sun and the sweet weather spread the happiness all around, create in me the wish to celebrate. For that, I make a couple of hand carved stamp set inspired to the sweeties that I love: cupcakes and ice-cream!


While I was creating these stamps, my idea was to make a set with which to be able to create cards and invitations for parties, such as birthdays. For that, in each set I add some little flags with which to create a bunting as decorations. 


Use a pen to draw the thread of the bunting, and the eyes and the mouth to the ice-creams and to the cupcakes... and the game is done! I hope you like these stamps sets, you can find both on my etsy shop! Check them out here!!!


Tuesday, 12 March 2013

How to use and to take care of hand carved rubber stamps


Stamps allow to print images onto a huge number of materials: from paper to plastic, from wood to fabric, from glass to ceramic, the list is so long! Out of any doubt, this is probably the easiest technique for printing because it is so immediate. It is sufficient to find the right ink for your purpose to start the adventure. Many of you have asked for advises or tips about how to use hand carved rubber stamps or about how to take care of them after using... For that, I take decision to write a post to summarize all my instructions and tips that I was able to gather during my personal experience....


We start with inks. Actually, one of key knowledge about the use of stamps, is to choose the right ink pad for your purposes. Fortunately, you can find a huge range of varieties of ink pads on the market place. For instance, I experienced the use the Versacraft's and ColoBox's, because they are good quality and very versatile inkpads, which are optimal both on paper and on fabric. In this last case, you need to iron on high heat for few minutes onto the print in order to make your image permanent to washing (in any case, it is preferable to wash your fabric up to 30° C not to damage your printing).


I have recently discovered an inkpad called Versafine, which is able to capture fine details like no other. Thus, it is very useful for industrial stamps that, differently to the hand carved ones, are harder and absorb with much difficulty the ink issuing an inexact print. This ink pad is very useful in these cases, in order to make a very exact print of your image!


About stamping onto other materials, I find out that ArchivalInk is very useful for projects that need a waterproof and permanent ink. For instance, I use this ink to stamp onto very smooth surfaces, such as  the shrink plastic. The StazOn is appropriate for all surfaces, but it is especially designed for the use on plastic, metal, glass, ceramic, laminated or coated papers, and leather. Differently to the Versacraft, StazOn is not suitable for fabric. For these special inkpads, I suggest to read carefully the instructions on the box in order to have best results.


And now, some insights about how to clean your hand carved rubber stamps. They need to be careful because they are more fragile and delicate than industrial ones. Pay attention to avoid to twist or scrub them. Press the stamp several times on the work surface or on some paper to remove the excess ink. If you would like to obtain a cleaner stamp, you can also use a kneaded eraser on which to dab your stamp. You can also rinse it with some fresh water and allow it to air dry completely. But in all cases, be really careful to never scrub or scrape it, even a little hurt with your nails can damage your stamp! My recommendation is just not to want to bring the rubber to the "white" because a) it is not needed for using your correctly the stamp and b) it could damage it.


Some last words about storage stamps. It is important not to stack stamps in top of each other because they could stick to each other. Store your stamps with their carved face up in a plastic or wooden cases, so you will keep them free from dust. It is also preferable to avoid to expose them to excessive heat or light, this will damage your stamps. I hope that all these tips and instructions could be useful, but do not hesitate to write your special tips or experiences in the comments. Bye!


Blog Widget by LinkWithin